
Want to combine CSV files from a folder in Excel without VBA? In this tutorial you’ll use Power Query to point at a folder, combine every CSV into one clean table, and enable auto‑refresh so next month’s file drop updates your report in one click.
TL;DR
If you receive the same report every period (e.g., monthly CSVs), you can point Power Query at a folder, combine all files, and auto‑refresh next time you drop a new CSV into that folder—no manual copy‑paste ever again.
- Time: 10–15 minutes
- Works with: Excel for Microsoft 365 and Excel 2019/2021 (Power Query)
- Deliverable: A clean, analysis‑ready table and an optional PivotTable dashboard
What you’ll build
- A single table that appends all CSVs in a folder (e.g.,
Sales_2026-01.csv,Sales_2026-02.csv, …). - An auto‑refresh pipeline: drop new CSVs into the folder → click Refresh All → reports update.
- (Optional) A PivotTable that summarizes revenue by month and product.
Sample data (copy & save these files)
- Create a folder on your machine, e.g.,
C:\Data\MonthlySales(Windows) or/Users/<you>/Data/MonthlySales(macOS). - Create two CSV files in that folder with the following contents.
File: Sales_2026-01.csv
File: Sales_2026-02.csv
You can add more monthly files later (e.g.,
Sales_2026-03.csv). The query will pick them up automatically.
Step‑by‑step
1) Connect to the folder
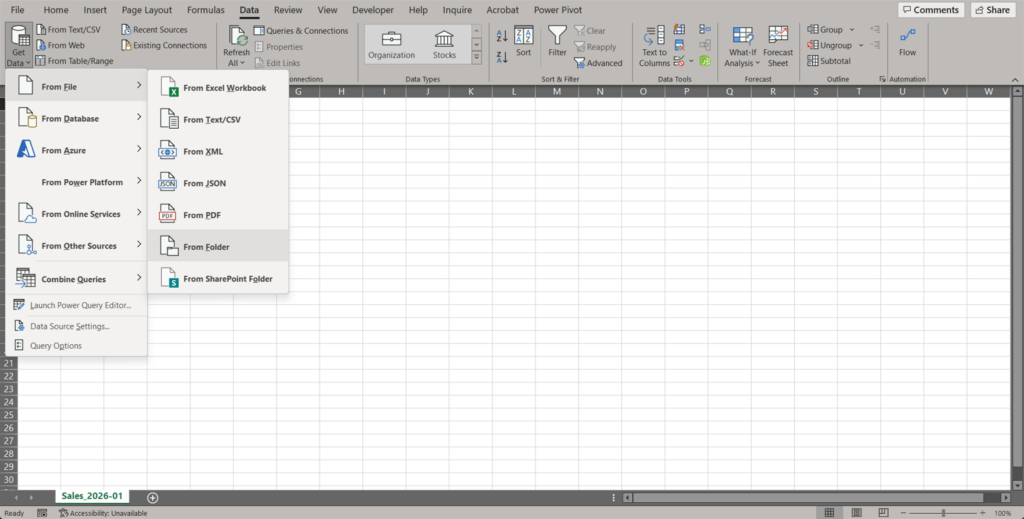
- Open a new workbook → Data tab → Get Data → From File → From Folder.
- Browse to your folder (
…\MonthlySales) → Open. - In the preview, click Combine → Combine & Transform.
- This creates a small “sample query” and a main query that appends all files.
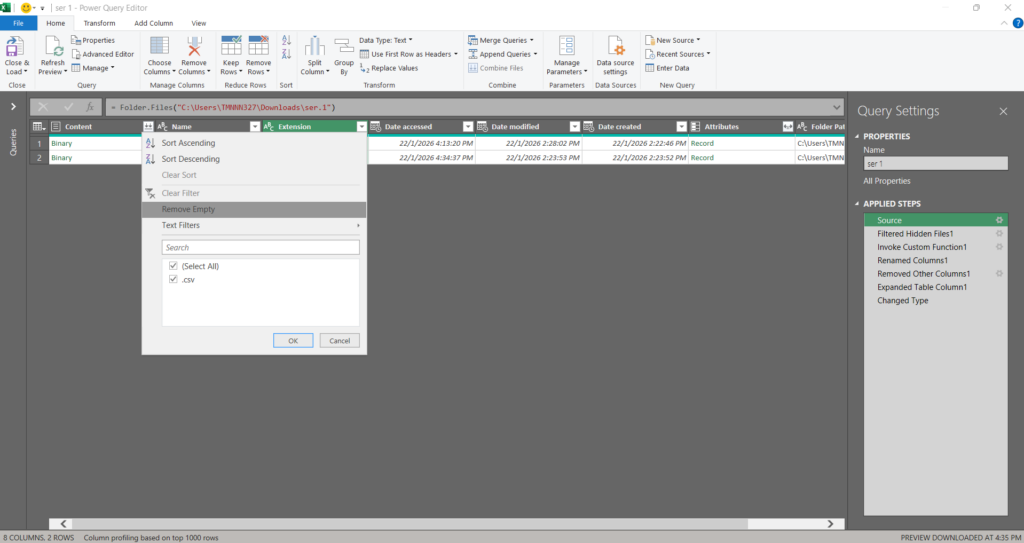
2) Keep only the CSVs you want (optional)
If the folder has different file types, in the query Source step:
- Filter Extension to
.csv. - If your files follow a naming convention (e.g.,
Sales_YYYY-MM.csv), you can also keep rows where Name begins withSales_.
3) Clean and standardize once
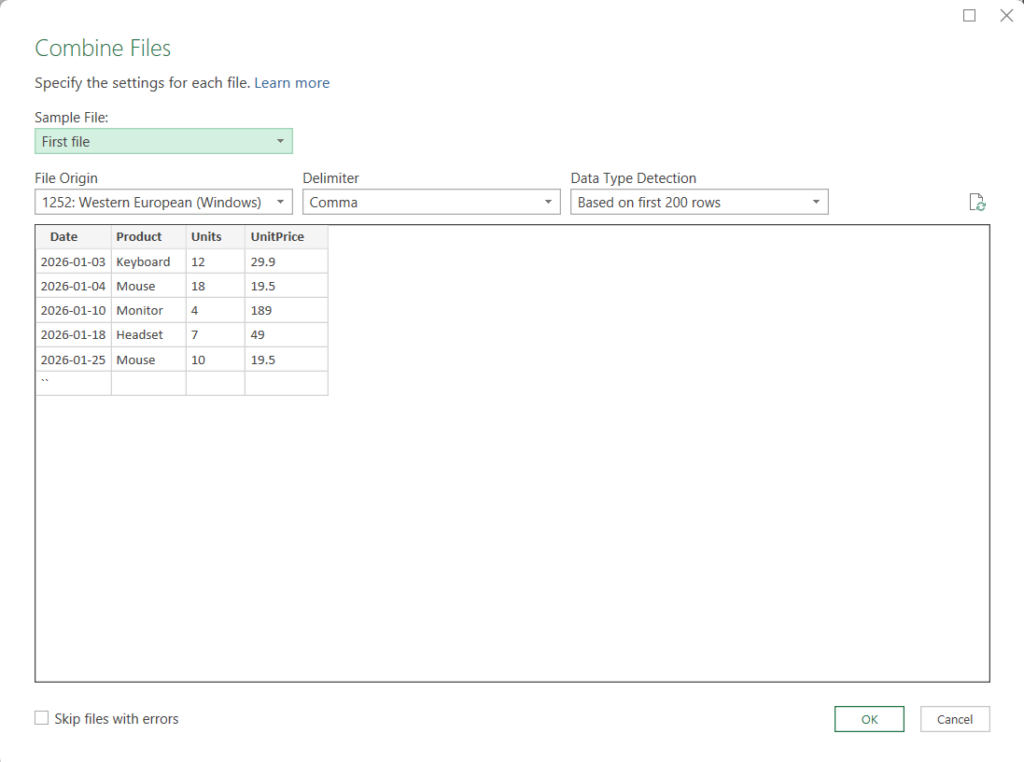
In the Transform Sample File (and reflected in the main query):
- Promote Headers if needed (Home → Use First Row as Headers).
- Set column Data Types:
- Date → Date
- Units → Whole Number
- UnitPrice → Decimal Number
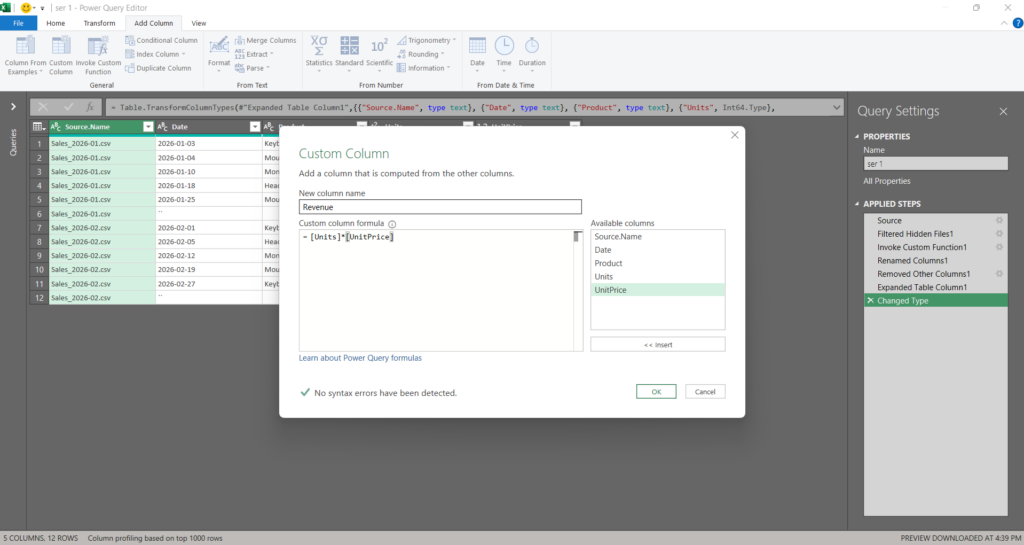
- Add a calculated column Revenue = Units * UnitPrice (Add Column → Custom Column).
- Extract Month from the Date (Add Column → Date → Month → Start of Month) and rename to MonthStart.
4) Capture the month from the file name (optional)
If your files encode the period (e.g., Sales_2026-02.csv), you can add that too:
- In the main query, click Add Column → Custom Column and use:
= try Date.FromText(Text.Middle([Name], 6, 7) & "-01") otherwise null- Rename to FileMonth and set type Date.
If the date in file contents is reliable, this step is optional. It’s handy for cross‑checks.
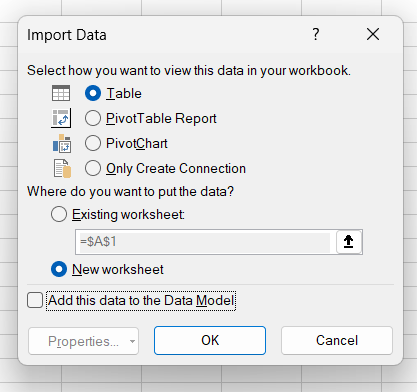
5) Load the table
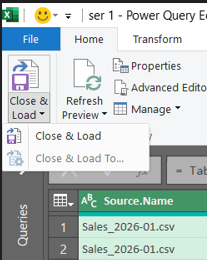
- Home → Close & Load → Close & Load To… → select Table on Existing worksheet (choose a cell like A1).
- You now have one consolidated table (e.g., named
Sales_All).
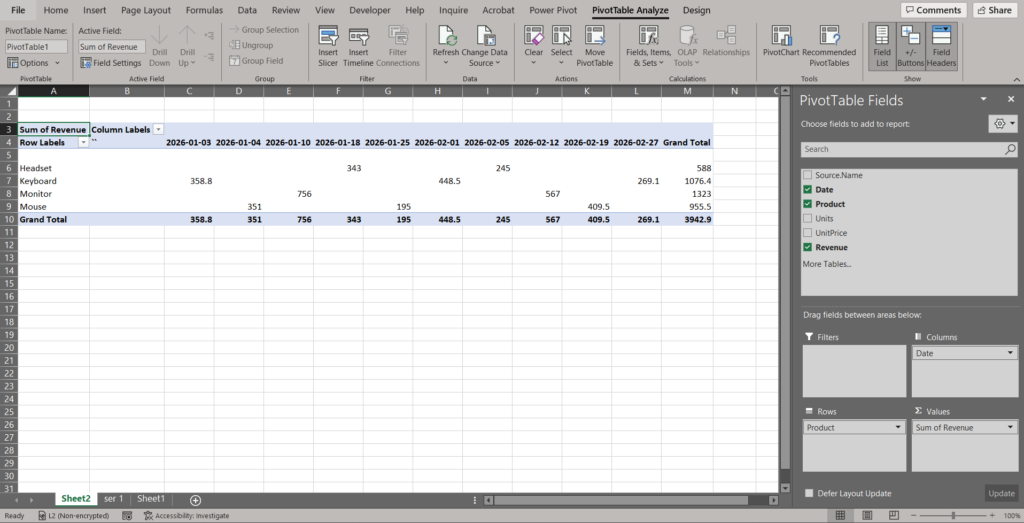
6) Build a quick PivotTable (optional)
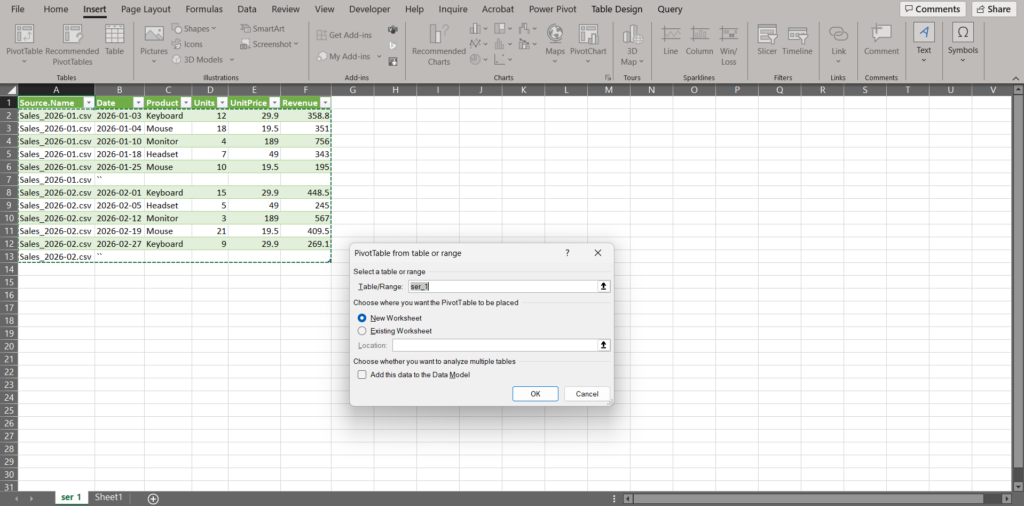
- Click or select inside the result table → Insert → PivotTable → New Worksheet.
- Drag fields: Rows:
Product• Columns:MonthStart• Values:Revenue (Sum). - Add a Slicer for
Productor a Timeline forMonthStart.
7) Turn on auto‑refresh
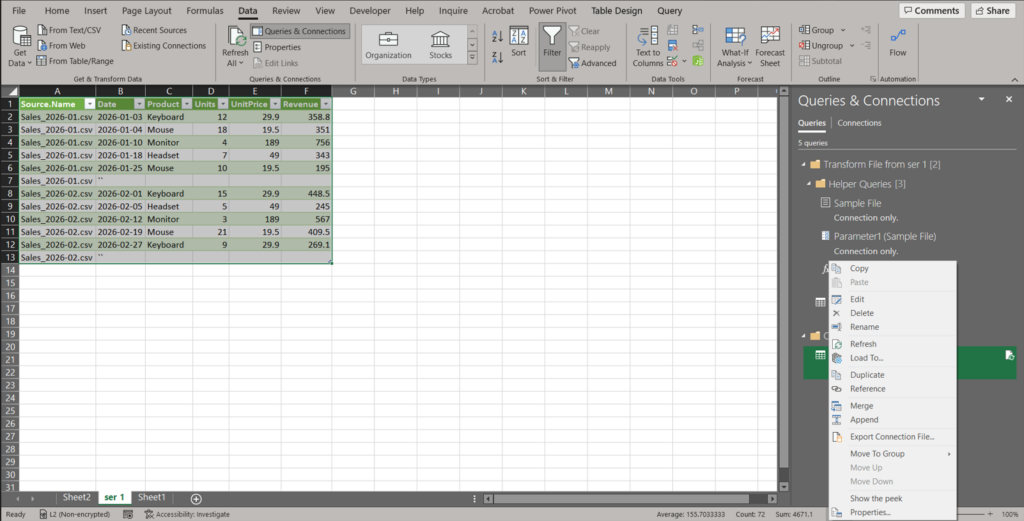
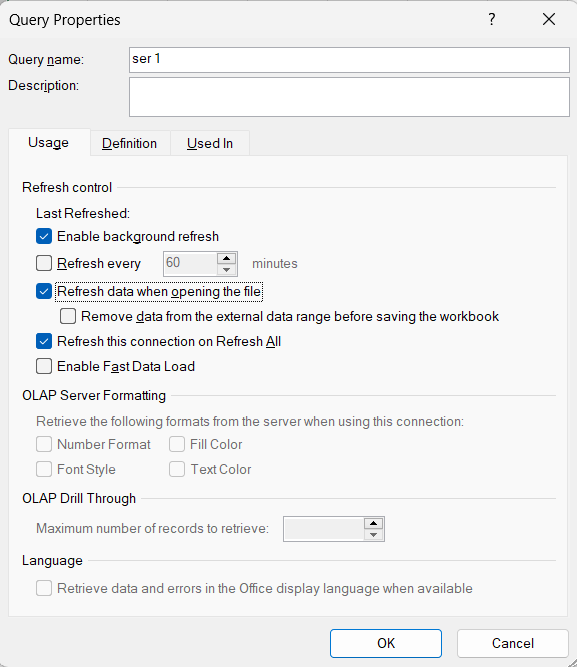
- Data → Queries & Connections → right‑click your query → Properties…
- Check Refresh data when opening the file.
- Optionally set Refresh every X minutes if the folder updates frequently.
- Next month, just drop
Sales_2026-03.csvinto the folder and click Data → Refresh All.
Copy‑paste: full M code (for reference)
You don’t need to hand‑edit this, but if something breaks you can replace the query with the version below. Replace
C:\\Data\\MonthlySaleswith your path (double backslashes on Windows).
let
    // 1) Point to folder
    Source = Folder.Files("C:\\Data\\MonthlySales"),

    // 2) Keep only CSVs that start with "Sales_"
    KeepCSV = Table.SelectRows(Source, each [Extension] = ".csv" and Text.StartsWith([Name], "Sales_")),

    // 3) Import each CSV as a table (let Excel infer delimiter/encoding)
    GetContent = Table.AddColumn(KeepCSV, "Data", each Csv.Document([Content], [Delimiter=",", Columns=4, Encoding=65001, QuoteStyle=QuoteStyle.Csv])),
    RemoveContent = Table.RemoveColumns(GetContent, {"Content"}),

    // 4) Promote headers and set types on each table
    PromoteAndTypes = Table.TransformColumns(
        Table.TransformColumns(RemoveContent, {"Data", each Table.PromoteHeaders(_, [PromoteAllScalars=true])}),
        {
            "Data",
            each Table.TransformColumnTypes(_, {
                {"Date", type date},
                {"Product", type text},
                {"Units", Int64.Type},
                {"UnitPrice", type number}
            })
        }
    ),

    // 5) Append all tables
    Expanded = Table.ExpandTableColumn(PromoteAndTypes, "Data", {"Date","Product","Units","UnitPrice"}, {"Date","Product","Units","UnitPrice"}),

    // 6) Add Revenue and MonthStart
    AddRevenue = Table.AddColumn(Expanded, "Revenue", each [Units] * [UnitPrice], type number),
    AddMonthStart = Table.AddColumn(AddRevenue, "MonthStart", each Date.StartOfMonth([Date]), type date),

    // 7) Parse FileMonth from file name like "Sales_2026-02.csv"
    AddFileMonth = Table.AddColumn(AddMonthStart, "FileMonth", each try Date.FromText(Text.Middle([Name], 6, 7) & "-01") otherwise null, type date),

    // 8) Keep relevant columns
    Reorder = Table.ReorderColumns(AddFileMonth, {"Date","MonthStart","FileMonth","Product","Units","UnitPrice","Revenue","Name","Folder Path"})
in
    Reorder
``
Common errors & quick fixes
- Dates come in as text
Cause: Locale mismatch or non‑standard format in CSV.
Fix: In Power Query, select the Date column → Transform → Data Type → Date → if prompted, choose Using Locale… and pick the CSV’s original locale. - Columns change order or new column appears next month
Cause: Source file structure drift.
Fix: In the sample query, map columns by name (not position). Avoid hardcoded column indexes. - Query can’t find the folder when you share the file
Cause: Different path on a teammate’s machine.
Fix: Convert the folder path into a Parameter (Home → Manage Parameters) and reference it in theFolder.Files(Parameter)call. Teammates can update just that parameter. - Very large folders = slow refresh
Cause: Too many files (including backups).
Fix: Keep the folder tidy or add a Name filter (e.g., onlySales_20), and consider archiving old CSVs to a subfolder that the query ignores.
FAQ
A: Yes—fewer errors, repeatable steps, and easy refreshes when new data lands.
A: No. Power Query handles the entire import‑combine‑clean pipeline.
A: Yes. Use Data → Get Data → From SharePoint Folder or store the folder in OneDrive and connect with the appropriate connector.
Reuse this pattern
- Monthly finance statements, inventory snapshots, log exports, survey downloads—anything that comes in multiple CSV files with the same columns benefits from this approach.
Download & assets (replace with your own links)
Sample workbook (.xlsx): pq-folder-combine.xlsx

One‑page checklist
- Create folder and add CSVs
- Data → Get Data → From Folder → Combine & Transform
- Set data types; add Revenue; add MonthStart
- Optional: parse FileMonth from file name
- Close & Load as Table
- Build PivotTable (optional)
- Query Properties → Refresh on open
- Drop next month’s CSV → Refresh All
Leave a Reply